Tokens are placeholders that Laserfiche Workflow replaces with current and relevant information each time a workflow runs. By harnessing the power of tokens, users can make robust and dynamic workflows that can handle even the most complex business processes.
The %(Date), %(Time), and %(DateTime) tokens are frequently used throughout Laserfiche to record the date and time a document is accessed or processed. The Date Token Calculator activity in Laserfiche Workflow lets users to manipulate these tokens (and other date and time-related tokens) to create new tokens that represent any date and time.
Below are three examples that explore the many options available with this activity.
Example 1
When a project proposal is submitted, a meeting needs to be set up for the following Monday so the department can discuss the proposal. The Date Token Calculator activity can create a token that finds the next Monday after the date the proposal is submitted.
To create this token, add the Date Token Calculator activity to a workflow and click New Token. In the New Date/Time dialog box, use the drop-down menu next to Date to choose Next Day of the Week and use the drop-down menu next to The first to select Monday. If this activity is used right after the proposal is submitted (for example, if the proposal submission starts the workflow or satisfies a wait condition), leave the default %(Date) token next to after.

Example 2
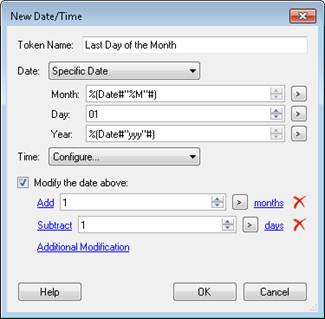
The deadline for processing payroll is always the last day of the month. Since months have varying numbers of days in them, a company needs to create a token that always returns the last day of the month.
To create this token, open the New Date/Time dialog box. Choose the Specific Dateoption, and replace the token syntax next to Day with “01.” This configuration will create a token that always returns the first day of the current month. Because the token should return the last day of the month, we need to modify this token further. Select the Modify the dateabove checkbox, and then add one month and subtract one day. The token will now return the last day of the month regardless of the number of days in the month.
Example 3
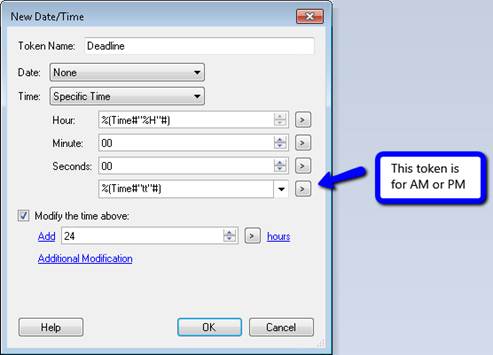
When a purchase order is received, a company has 24 hours to fill and ship the order. The deadline is rounded down to the hour for the warehouse’s convenience. The company needs a token that retrieves the hour the purchase order was received, notes whether it was received in the AM or PM and adds 24 hours to that time. For example, if a purchase order is received at 2:33PM on 1/26/13, the Deadline token returns 2:00PM on 1/27/13 for the deadline.
To determine the deadline for each purchase order, choose Specific Time next to the Timeoption. Put zeros next to the Minute and Seconds options, but leave the existing syntax next to the Hour and AM/PM options. Select the Modify the time above checkbox, and add 24 hours. The token now takes the current hour and adds 24 hours to it, giving the correct deadline.