

Rosalind Collins, Deputy Commissioner of Revenue for the City of Charlottesville, VA offers some practical advice on efficiently and effectively scanning documents into the Laserfiche repository.
Scanning documents requires much more than just running them through a scanner and sending them into Laserfiche. Configuring the scanning session, preparing the documents and quality control are equally important to—if not more important than—scanning mechanisms. Efficient scanning saves time and results in an organized and functional repository.
Tweak your settings
Just a few simple changes to your settings can make a big difference in the efficiency of your scanning process.
- Uncheck the “Display images as they are processed” box in the “General” tab of the Options menu. This will significantly increase your scanning speed.

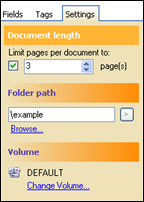
- Be careful when configuring the Document Length property in the Default Properties – Settings tab for documents longer than one page. Scanner malfunctions do not reset the pages count in the Document Length setting.


Prepare your documents for scanning
“Consistency in organization will ease your pain in both sorting and using that information for efficient, accurate indexing.”
Why is document preparation necessary?
- It leads to more efficient scanning.
- It reduces indexing errors.
- It ensures that document pages are correctly included together and minimizes duplication.
- It helps you keep a discerning eye on documents.
How to prepare documents:
- Remove staples.
- Clip pages together if needed.
- Identify the pages, group them together and then sort the documents.
- Count pages and documents. Monitor as you scan for skipped pages.
Use slip-sheets, which help scanner operators visually distinguish between different documents. Also make sure each document has all the necessary information in a place that is easy to locate and read, such as a cover sheet. Laserfiche Scanning offers features to remove slip-sheets and cover sheets before the documents are stored in your repository.
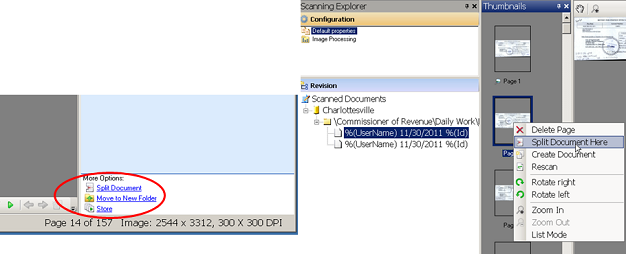
Employ the “batch/split” method
Why use this method?
- It minimizes data entry.
- It enhances accuracy.
- It minimizes stopping and starting.
How to use the “batch/split” method:
- Sort and prepare all of your documents.
- Scan them in one batch as one large document.
- Use the Split Document tool to divide your document into smaller documents.


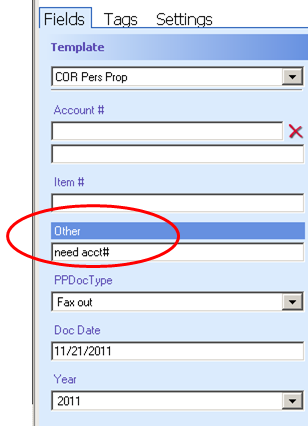
- Make notes for post-scanning processing.
Example: The Account # was not processed correctly here and is missing, so in the Other field, I have written “need acct#”

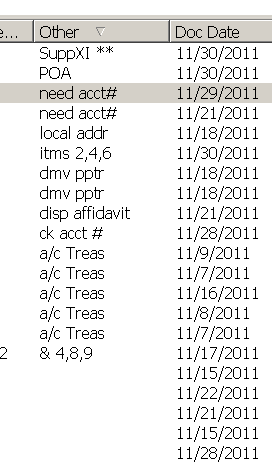
- Send all of your documents to Laserfiche.
- Open the destination folder and click on any column name to sort. Make sure that you have modified your settings in your folder to view the Other template field.
- You can easily find the documents needing additional work in the Other column.


Perform quality control
“Performing regular quality control is like repository gardening.”
Quality control of your scanned documents is very important but often not given full consideration. Make sure you perform quality control in the following situations:
- Prior to scanning.
- During the scanning process.
- While you are updating the metadata (indexing).
- After sending your scanned documents to Laserfiche.
Don’t forget to perform regular quality control sessions on your entire repository. It will help keep your Laserfiche system organized and accurate.